How do I schedule a campaign to run at a certain time?
Sometimes advertisers want their campaign to show at a specific time, because they know when their target audience is active on the Internet and they want to present their ad to them just then!
You can easily specify the display time of an ad while you are creating the campaign. Time targeting options are located on Step 5 – Time.
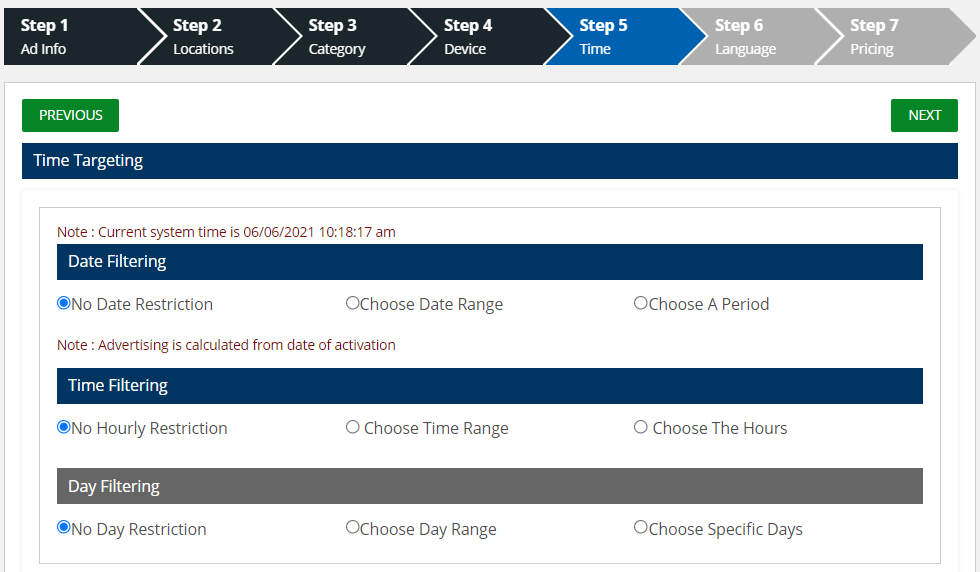
The platform automatically assigns the NO RESTRICTION option. If time doesn’t matter to you, you can skip this step. If you want to set the time, you have three options:
Date Filtering
With this option, you can select your own date or time for displaying the ad.
By checking CHOSE DATE RANGE, you will be offered two fields — START DATE and END DATE. Clicking these fields opens your calendar to determine the date in which you want your campaign to start and when you want it to end (for example, you want the ad to be displayed from 6th to June 10th).

Another option is to simply specify the number of weeks during which the ad will be displayed. You’ve been offered one to four weeks. Advertising starts from the activation date.
Example: You activated the campaign and marked the ad to be shown for 1 week. The display of the ads starts the moment our operators approve the ad (approval is made as soon as possible, mainly on the same day). The advertisement is approved on May 7th , 2021 at 3 p.m., which means it will be shown until May 14th 2021 at 3 p.m., when it is automatically canceled.

Time filtering
Set at what time of day you want your ad to be displayed. As with the date, you have two options here.
The first is to set your own display time by adjusting how long your ad will be shown.

In the second option, you have the time automatically offered, so simply check if you prefer one of these periods.

Day Filtering
You want your campaign to be shown only on weekends? Or just weekdays? Or all the days except Sundays? It’s possible!

Or just check days in the week in which you want to show your campaign.

Note:
If you are targeting the time, you must click the button UPDATE after you specify the parameters that you want.
If you’re not setting up anything in this field, you don’t have to confirm anything, just skip step 5.

